

Install Macos Sierra On Unsupported Mac

What if we want install Sierra from scratch in a Mac not supported? Well, we can't ... or non officially. In fact, if at that place are Hackintosh, how can macOS non be installed on an Apple computer? Yes y'all can. In this commodity nosotros will teach yous everything you need to know, which includes the bug that we may encounter in the present and in the hereafter.
Table of Contents
- 1 Install macOS Sierra on Unsupported Macs
- one.1 Requirements
- 1.2 Things to keep in mind
- 1.iii Our Process
- ii And how do I update macOS Sierra on my unsupported Mac?
Install macOS Sierra on Unsupported Macs
Requirements
- A copy of the macOS Sierra installer. Although it tin can be found online, information technology is best to go it by downloading it from a supported Mac.
- A minimum 8GB USB stick.
- The macOS Sierra Patch Tool, available from here!.
- The AUSEnabler tool, available from here!.
Things to keep in mind
We have to bear in mind that what we will be installing on an unsupported Mac is a kind of Hackintosh, that is, install Mac on a computer where we should not be able to install it, even if information technology is a Mac. This means that we may come across some problem such as the following:
- In that location may exist Wi-Fi problems. Macs with the Broadcom BCM4321 Wi-Fi module will non work with macOS Sierra unless the Wi-Fi card is changed. The computers affected by this problem would be algunos MacPro3,1; MacBook5,2; MacBookPro4,i; iMac8,one; Macmini3,1 and MacBookAir2,ane.
- El MacBook5,2 trackpad is not supported. It works, merely information technology detects it equally a mouse and some settings for the Trackpad are not available.
- El iMac viii,i sound has a problem in which the volume does not change even if it indicates that it does. Audio works, merely always goes to the maximum. A solution would be to put some speakers connected to the headphone output and command the volume from them.
- We already know that we will not be able to update from the Mac App Shop. In September nosotros valued ii possibilities: ane) the updates are installed without presenting bug; 2) updates practice not announced and / or are not installed; To solve this, we will have to utilize AUSEnabler.
To give yous an idea, I have information technology installed on an iMac from the beginning of 2009 and the only problem I accept encountered so far is that sometimes (few) I have to connect the Wi-Fi manually when starting or waking upwards of rest. Regarding updates, iTunes did update me, and so we already know that Apple software will be updatedno problem.
Our Procedure
The process is very simple. It volition but be necessary to follow these steps:
- We put the USB in the Mac where we are going to create the Bootable USB.
- We open Disk Utility.
- We select the root of the USB, click on "Delete" and select everything every bit in the following screenshot (we can put the proper name we desire):
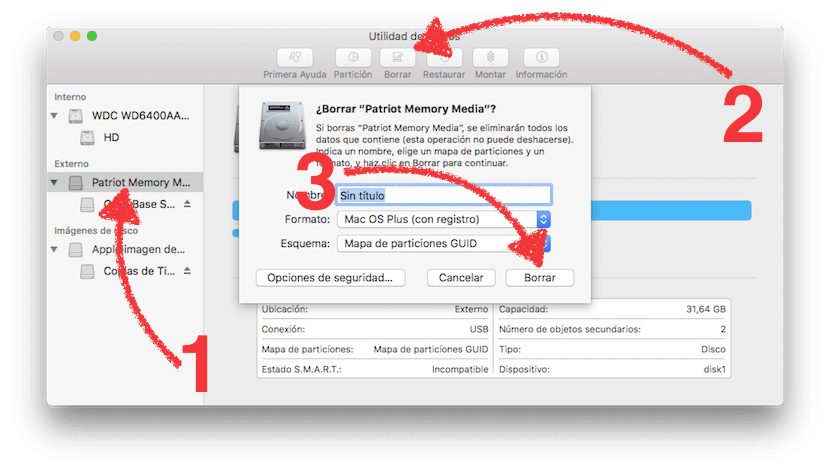
- Showtime Proper noun: whatever we want.
- Format: Mac OS X Plus (Journaled).
- Scheme: GUID sectionalization map.
- To format, we click on «Delete».
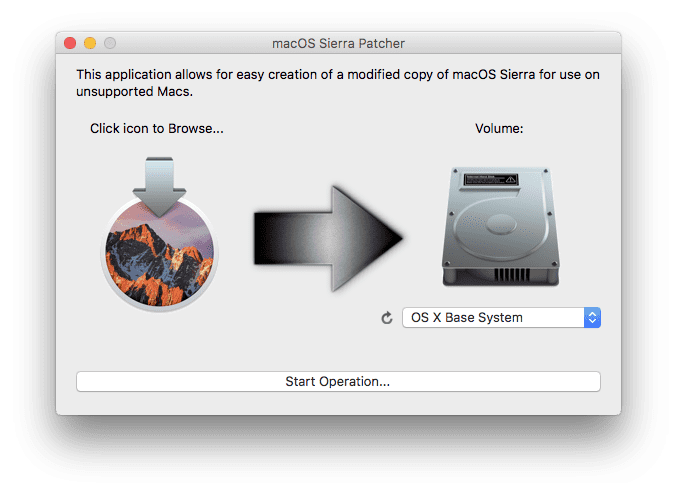
- With the USB already created, nosotros open up macOS Sierra Patcher.
- Nosotros click on "Click icon to Scan ..." and select the macOS Sierra installer.
- In "Volume" nosotros select the USB drive.
- We click on "Start Operation ..." and wait for information technology to finish.
- With the USB already created, now we will have to start from it. To exercise this, we restart and continue the ALT key pressed until we come across the bachelor units.
- From the drives we see, nosotros cull the USB Bootable that volition take the name "Bone X Base Organization".
- The installation is like any other: if we want to install from 0, go to the "Utilities" tab, choose Disk Utility and erase the entire hard drive. So nosotros start the installation of macOS Sierra and wait for the procedure to finish.
- Once installed, information technology will reboot automatically. Hither we volition have a trouble, and that is that it volition not be able to start the operating system. At that time nosotros accept to plough off the Mac with the ability button.
- We plow on the computer again and printing the ALT primal again to outset from the USB.
- Now nosotros go to Utilities and choose "macOS Post Install".

- Here nosotros will encounter that we have a drop-down menu. On top of it we have which computer information technology has detected. We display the carte and cull the aforementioned blazon of Mac that we come across higher up, in my case an iMac9,ane.
- Here it is appropriate to leave what is by default checked, but nosotros tin can also choose to patch the recovery partition (I exercise not recommend information technology because it does not work for me), the ambient light sensor and the Ethernet adapter. If you lot don't have any of that, I would leave only the first and 3rd boxes checked.
- Next, nosotros select the book where the patches will be installed. The book is the hard bulldoze where we take installed macOS Sierra.
- Finally, we click on "Patch" and expect.
- When you restart, nosotros will just have to follow the steps to configure the new installation.
If you prefer, you can run into how to install macOS Sierra on an unsupported Mac in the following video.
And how do I update macOS Sierra on my unsupported Mac?
Well, the offset thing you have to know is that you tin't unless you either get the paradigm of a more modernistic version and carry out the whole process from scratch, which would eliminate all the data, or y'all utilise a version that will exist uploaded to a third-party server. If you lot want to use the second of the previous options, you only have to add a few steps to the previous process:
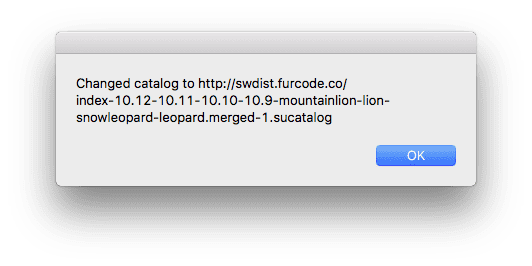
- Nosotros open up AUSEnabler.

- We click on «Switch Catalogs». This will make it no longer await for updates on Apple tree'south servers, if not on an unofficial ane. If you go ahead, each one is responsible for their deportment.

- And we would already have it. Finally, we click on «OK». Now nosotros have to wait for the new version to be uploaded to the servers, which tin can accept a few hours or a few days.
Have you managed to install macOS Sierra on an unsupported Mac?
The content of the article adheres to our principles of editorial ethics. To written report an error click hither!.
Source: https://www.soydemac.com/en/instalar-macos-sierra-mac-no-soportado/
0 Response to "Install Macos Sierra On Unsupported Mac"
Post a Comment